Table of Contents
The CPU is the pounding heart of your computer. Below’s how to install it. The whipping heart of any PC is its central processing unit or CPU.No wonder a quick CPU is a point of pride for lots of lovers. It’s additionally essential for any person seeking to obtain intensive work done.
In the last few years, updating to a bleeding-edge CPU has come to be lesser due to ever-faster graphics cards as well as the experience-altering goodness of SSDs. But with the current intros of 12th-gen Intel “Alder Lake” and AMD Ryzen 5000 processors, the CPU fights are warming up once again in both prices as well as performance!
With so much on the line, you intend to get it right. Swing over to our overview of the very best CPUs for video gaming to assist with picking your next processor, then follow these step-by-step instructions on exactly how to mount a CPU on your computer.
Just how to mount an Intel CPU
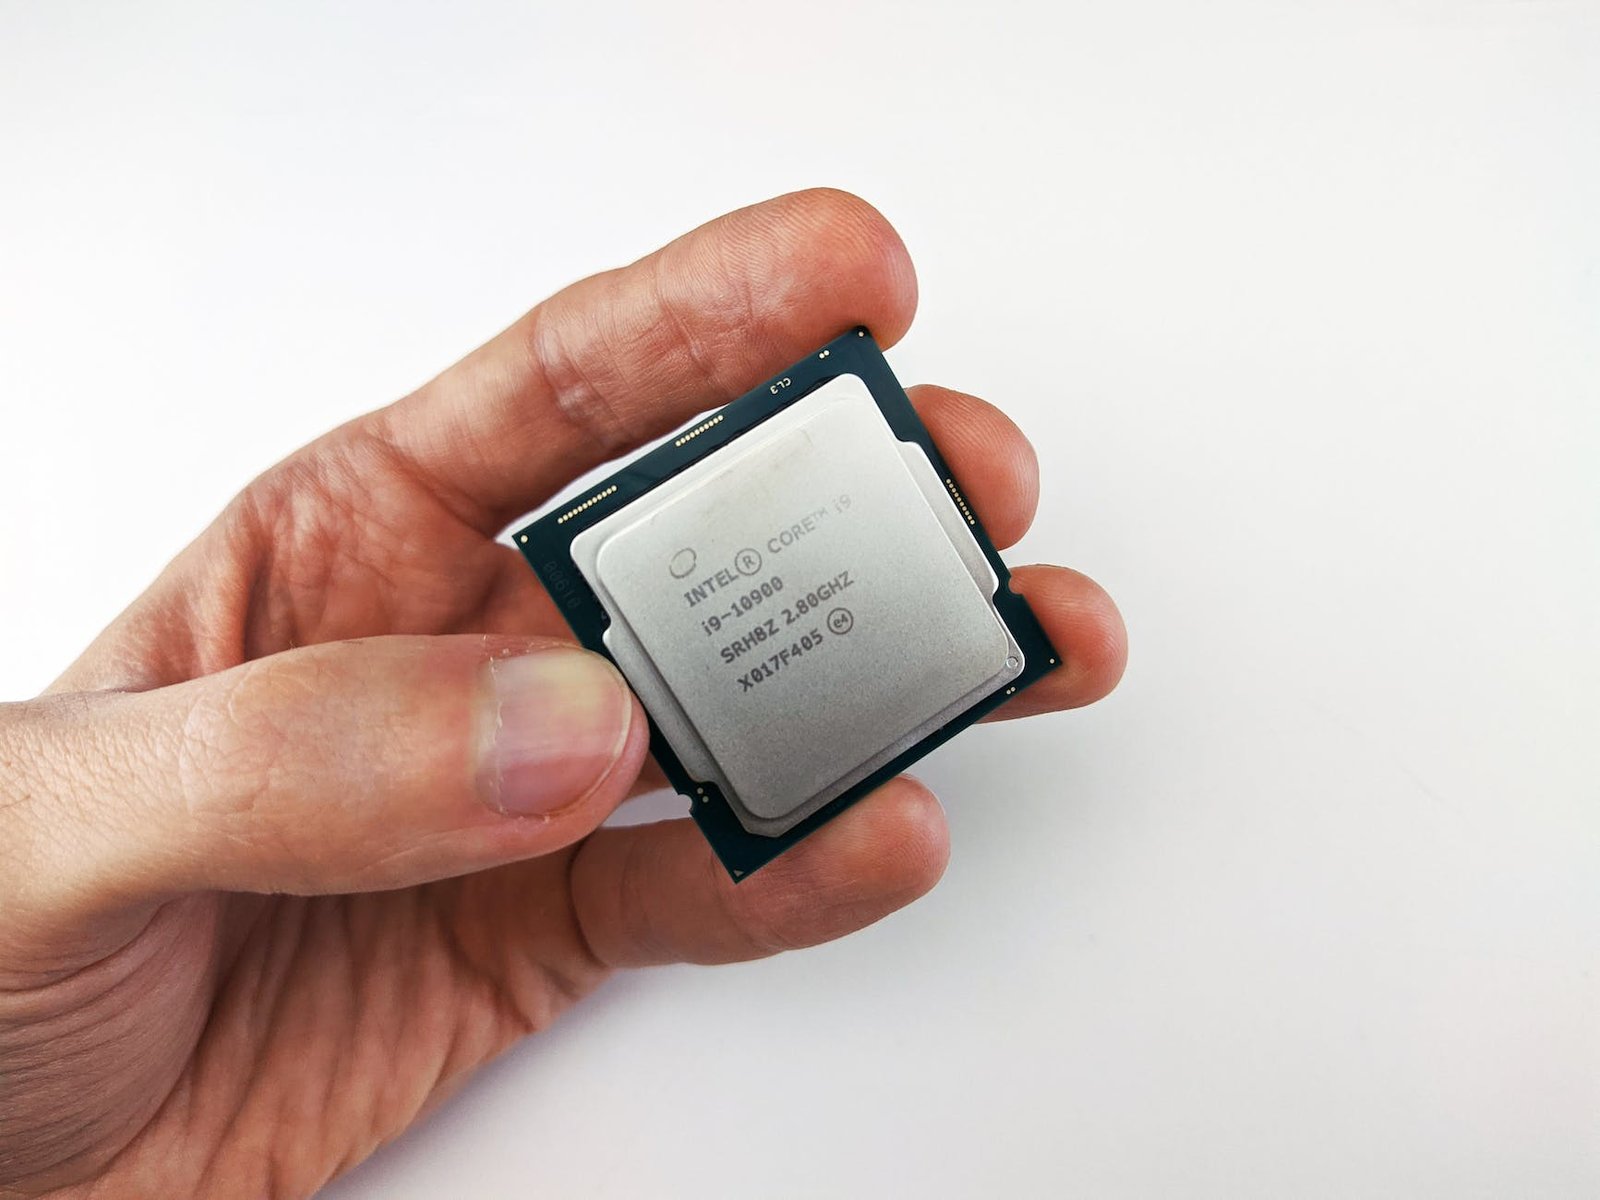
First, we’ll check out mounting Intel’s CPUs, and afterward AMD’s chips. Beginning with your motherboard outside of your PC’s situation, on a level surface. Release the tiny metal lever holding the CPU retention brace to Intel’s LGA outlet in the motherboard.
Currently, you can place your chip. See to it that you align both assisting notches on the socket with the notches along the side of your chip. These notches are made to stop you from seating the CPU in the outlet in an improper way. The CPU will usually have a little triangle or similar indication to line up with the outlet, such as on the reduced left.
With the chip seated in the socket, you can reduce the retention bracket back right into location. Make certain that you slide the notch at the end of the bracket around the single screw at the base of the socket prior to you using the metal bar to secure the CPU into location.
When the CPU’s mounted, it’s time to connect the colder. If you’re making use of the stock Intel cooler there will certainly already be thermal oil on the underside of the heatsink. If you’re utilizing an aftermarket cooler, after that you’ll need to use a small rice-grain-sized dot of thermal grease– your cooler likely came with a tiny syringe of it– to the facility of the CPU prior to you setting the heatsink in addition to it.
One of the good features of Intel’s supply heatsink is that it makes use of push pins to connect itself to the motherboard. Just place the colder on top of your CPU and afterward press the push pins into the holes at each edge of the socket. Once the pins have been pressed via to the opposite of the motherboard, press the black securing tab down right into the placing pin and also spin it toward the center of the CPU, adhering to the arrowhead engraved into the push pin, to lock the heatsink into location.
The last action is to connect the fan header cable leading from your CPU to the CPU follower header on your motherboard.
CPU fan install
Do not forget to link the colder fan to your motherboard! For aftermarket holders, this procedure can be a lot more complex and potentially involve custom-made heatsink retention braces and mounting options. It’s ideal to follow the maker’s directions as well as refer to the relevant YouTube video clips for assistance with those items.
Exactly how to install an AMD CPU
AMD’s chips have both a different type of socket (called AM4) and a different technique of mounting heatsinks compared to Intel’s system. One trick distinction is that you’ll locate the pins on the CPU itself instead of the motherboard, so take additional treatment while managing these.
Side note: When removing an AMD cooler, go gradually and also carefully, as some coolers have been recognized to remove the CPU from the outlet with sticky thermal paste. The AMD retention brace is not as strong as the one used by Intel.
AMD CPU adhered to the cooler
Do not allow this to occur to you when you’re removing an AMD Ryzen processor.
To set up an AMD Ryzen CPU on your computer
Start by turning the CPU locking bar up from the outlet. After that, you can put your AMD CPU in the outlet as though the gold triangular on the corner of your chip pairs up with the engraved triangle on the edge of the CPU socket. A light press must then seat your CPU securely in the outlet. Reduced the retention lever on the side of the socket to secure your chip into place. Just like Intel’s stock cooler, AMD’s cooler will also feature thermal material on its underside from the factory. The large distinction between Intel’s and AMD’s stock air conditioning remedies is that while Intel’s mounts with push-pins, AMD’s places with a more conventional notch-and-lever combination.
Start by hooking the mounting brace on the cooler onto the plastic notch at the top end of the CPU socket. Then hook the brace onto the notch at the opposite end of the socket. From here you can toggle the securing lever to press the heatsink up against the CPU and hold the heatsink securely to the motherboard. Hooking both of the plastic notches with the heatsink installing bracket is one of the most challenging parts of this setup process.
You have to hook the colder’s bracket over the plastic notches on the cooler mounts at either side of the processor’s socket on the motherboard. Currently, you have actually effectively selected the ideal CPU for your computer build as well as you’ve correctly installed it into your motherboard. Your computer’s refrained yet, yet you’ve taken a big step on the road to computing paradise.
If you’re preparing to do water cooling, water blocks typically will have their very own mounting equipment for both AMD as well as Intel, with backplates as well as unique thumbscrew equipment. The exact same is true of third-party air coolers and all-in-one fluid colders too; adhering to the instructions that feature your cooler should produce good results.